
Beats Solo 3 Wireless Manual: A Comprehensive Guide
The Beats Solo 3 Wireless headphones are known for their iconic design, wireless connectivity, and impressive battery life. This comprehensive guide provides you with everything you need to know about these headphones.
The Beats Solo 3 Wireless headphones are a popular choice for music lovers seeking both style and performance. Featuring a sleek design and the iconic “b” logo, these headphones offer a wireless listening experience via Bluetooth. Equipped with the Apple W1 chip, they provide seamless pairing with Apple devices and exceptional battery efficiency, offering up to 40 hours of playtime.
Beyond their aesthetics, the Solo 3 Wireless deliver high-quality audio, ensuring an immersive sound experience. The on-ear controls allow for convenient music playback and call management. They also feature a built-in microphone for hands-free communication. Whether you’re commuting, working out, or simply relaxing, the Beats Solo 3 Wireless provide a versatile and enjoyable listening experience.
Getting Started
Ready to dive into your Beats Solo 3 Wireless experience? This section will guide you through the initial steps, from unboxing to powering on your new headphones and preparing for first use.
Unboxing and Initial Setup
Congratulations on purchasing your Beats Solo 3 Wireless headphones! Let’s get them ready for use. Carefully open the box and remove the headphones, ensuring you don’t damage any components. Inside, you’ll find the Beats Solo 3 Wireless headphones, a carrying case for protection during travel, and a RemoteTalk cable offering a wired listening option.
Additionally, there’s a universal USB charging cable for powering up your headphones. Take out all the components. Before you start, connect the USB cable to charge the headphones. While charging, familiarize yourself with the included documentation and safety manual. This will provide important information about proper usage and care. Once charged, you’re ready for pairing!
Powering On and Off
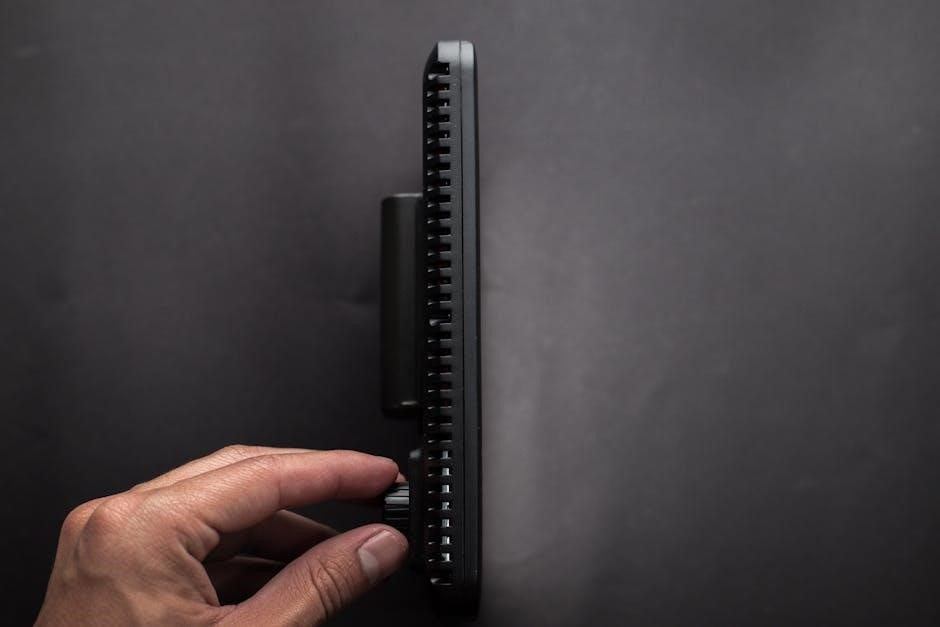
Now that you’ve unboxed your Beats Solo 3 Wireless, let’s learn how to power them on and off. Locating the power button is the first step. It is conveniently located on the right earcup. To power on your Beats Solo 3 Wireless headphones, simply press and hold the power button for approximately one second.
You’ll notice the LED Fuel Gauge lights illuminate, indicating that the headphones are now powered on and ready to pair with your device. Conversely, to power off your Beats Solo 3 Wireless, repeat the same process: press and hold the power button for one second until the LED Fuel Gauge lights turn off. This confirms that the headphones are now completely powered down.

Bluetooth Connectivity
Establishing a seamless Bluetooth connection is key to enjoying your Beats Solo 3 Wireless. The following sections will guide you through pairing with various devices and troubleshooting any connection issues.
Pairing with iOS Devices (iPhone, iPad)
Pairing your Beats Solo 3 Wireless headphones with your iPhone or iPad is a straightforward process, thanks to the Apple W1 chip. To begin, ensure Bluetooth is enabled on your iOS device. You can do this by swiping down from the top-right corner to access the Control Center or navigating to Settings > Bluetooth.
Next, power on your Beats Solo 3 Wireless headphones by pressing the power button for one second. Bring the headphones near your unlocked iPhone or iPad. A pairing card should appear on your device’s screen. Follow the on-screen instructions to complete the pairing process. Once paired, your Solo 3 Wireless headphones will automatically work with other devices signed into your iCloud account, making switching between devices seamless.
Pairing with Android Devices
Connecting your Beats Solo 3 Wireless headphones to an Android device is simple. First, ensure Bluetooth is enabled on your Android phone or tablet. Navigate to Settings > Connections > Bluetooth, or a similar path depending on your device’s manufacturer.
Next, power on your Beats Solo 3 Wireless headphones by pressing and holding the power button for 5 seconds. This will put the headphones into pairing mode, indicated by the Fuel Gauge flashing. On your Android device, scan for available Bluetooth devices. Select “Beats Solo 3 Wireless” from the list. If prompted, enter the pairing code (usually “0000”). Once paired, your Android device will remember the headphones for future use. The Beats app for Android can offer additional functionality.
Pairing with Mac or Other Bluetooth Devices
Pairing your Beats Solo 3 Wireless headphones with a Mac or another Bluetooth-enabled device is a straightforward process. First, ensure that Bluetooth is enabled on your Mac. You can do this by going to System Preferences > Bluetooth. Then, power on your Beats Solo 3 Wireless headphones. Press and hold the power button for 5 seconds until the Fuel Gauge begins to flash, indicating pairing mode.
On your Mac, the Beats Solo 3 Wireless should appear in the list of available Bluetooth devices. Select the headphones and click “Connect.” If prompted, enter the pairing code (usually “0000”). For other Bluetooth devices like laptops or PCs, the process is similar: enable Bluetooth, search for available devices, and select the Beats Solo 3 to connect. Ensure that the device supports A2DP Bluetooth profile for audio streaming.
Troubleshooting Bluetooth Connection Issues
Experiencing Bluetooth connection problems with your Beats Solo 3 Wireless can be frustrating, but several solutions can help resolve these issues. First, ensure that your headphones are in pairing mode by holding the power button for five seconds until the Fuel Gauge flashes. If your device doesn’t detect the headphones, try turning Bluetooth off and on again.
Another common issue is interference from other wireless devices. Move away from potential sources of interference, such as microwaves or other Bluetooth devices. If the connection is unstable, try forgetting the device in your Bluetooth settings and then re-pairing them. Make sure your Beats Solo 3 are updated with the latest firmware. A reset of the headphones might be necessary. If problems persist, consult the Beats support website for further assistance.

Wired Connection
The Beats Solo 3 Wireless headphones also offer a wired connection option using the RemoteTalk cable. This is useful when Bluetooth is not available or when battery is low.
Using the RemoteTalk Cable
To use the RemoteTalk cable with your Beats Solo 3 Wireless, simply plug one end into the 3.5mm port on the bottom of the right earcup and the other end into the audio source device. This will automatically disable the Bluetooth connection and switch to wired mode. The RemoteTalk cable allows you to control music playback, adjust volume, and answer calls.
The inline remote features a central button for play/pause and answering/ending calls, as well as volume control buttons. Press the center button once to play or pause the music, twice to skip to the next track, and three times to return to the previous track. When using the RemoteTalk cable, the headphones do not require battery power, making it a useful option when the battery is depleted or when connecting to devices without Bluetooth capabilities.

Controls and Functionality
The Beats Solo 3 Wireless offers intuitive controls. These controls allow users to manage music playback, adjust the volume, and handle phone calls with ease using the on-ear controls.
On-Ear Controls (Music Playback, Volume, Calls)
The Beats Solo 3 Wireless headphones have on-ear controls that allow you to manage music playback, volume, and calls seamlessly. The “b” logo on the left earcup acts as a multi-function button.
To control music playback, press the “b” button once to pause or play audio. Double-press the “b” button to skip to the next track, and triple-press to return to the previous track. Adjusting the volume is straightforward; press the upper part of the earcup to increase the volume and the lower part to decrease it.
For phone calls, a single press of the “b” button answers an incoming call or ends the current call. If you want to reject an incoming call, press and hold the “b” button for a few seconds. The built-in microphone ensures clear communication during calls.

Using the Built-in Microphone
The Beats Solo 3 Wireless headphones feature a built-in microphone that enables hands-free calling and voice assistant functionality. When connected to your smartphone via Bluetooth, the microphone automatically activates during incoming and outgoing calls, providing clear and convenient communication.
The microphone is designed to pick up your voice clearly while minimizing background noise, ensuring that the person on the other end can hear you without distractions. During a call, you can adjust the volume using the on-ear controls to ensure optimal hearing levels.
The built-in microphone can also be used to activate voice assistants like Siri or Google Assistant. Simply press and hold the “b” button on the earcup to activate your device’s voice assistant, allowing you to control music, make calls, set reminders, and more, all without touching your phone.

Charging and Battery Life
Understanding the charging process and battery life of your Beats Solo 3 Wireless is crucial for optimal use. Learn how to charge them and maintain their battery.
Charging the Beats Solo 3 Wireless
To charge your Beats Solo 3 Wireless headphones, use the provided universal USB charging cable. Connect the cable to a power source, such as a computer or a wall adapter. The headphones will begin charging automatically when connected to a power source. A full charge typically takes around two hours, providing up to 40 hours of playback time.
With Fast Fuel, a quick 5-minute charge gives you 3 hours of playback. It’s essential to use a reliable power source to ensure efficient charging. Avoid using damaged cables or adapters, as they can affect the charging process. Always disconnect the headphones once fully charged to preserve battery health.
Checking Battery Level
You can easily check the battery level of your Beats Solo 3 Wireless headphones. When the headphones are powered on, the Fuel Gauge LEDs on the right earcup will illuminate, indicating the remaining battery life. Five LEDs lit up indicate a full charge, while one LED suggests that the battery is low.
When paired with an iOS device, the battery level is also displayed on the screen, offering a convenient way to monitor the battery status. For Android devices, downloading the Beats app provides similar functionality, showing the battery percentage. Regular checks help ensure that your headphones are always ready for use, preventing unexpected power outages during critical moments.
Fuel Gauge Indicator
The Fuel Gauge on your Beats Solo 3 Wireless headphones is a set of five LEDs located on the right earcup. This indicator provides a quick visual representation of the remaining battery life. When you power on the headphones, these LEDs light up to show the current charge level.
Five solid LEDs indicate a full charge, while fewer lit LEDs signify a lower battery level. A single flashing LED means the battery is critically low and needs immediate charging. This simple yet effective system allows you to easily manage your listening sessions, ensuring you are never caught off guard by a dead battery. It also helps you plan your charging schedule efficiently, optimizing the lifespan of your headphones.

Troubleshooting
Experiencing issues with your Beats Solo 3 Wireless? This section addresses common problems, offering solutions for connectivity, charging, and performance, ensuring a smooth user experience.
Resetting Your Beats Solo 3 Wireless
If your Beats Solo 3 Wireless headphones are malfunctioning or experiencing connectivity issues, resetting them can often resolve the problem. A reset returns the headphones to their original factory settings, clearing any stored Bluetooth connections or corrupted data. This can be particularly useful if you’re having trouble pairing the headphones with your devices or if the audio quality is distorted.
To reset your Beats Solo 3 Wireless, press and hold both the power button and the volume down button simultaneously for 10 seconds. The Fuel Gauge LEDs will flash, indicating that the reset process has been initiated. Once the LEDs stop flashing, your headphones have been successfully reset. You can then re-pair them with your desired devices as if they were new. This simple step can save you from unnecessary frustration and get your headphones back to optimal performance.

Additional Resources
Explore further assistance for your Beats Solo 3 Wireless. Download the Beats app for Android or access the comprehensive online user manual for detailed instructions and support information.
Downloading the Beats App (Android)
Enhance your Beats Solo 3 Wireless experience on your Android device by downloading the Beats app from the Google Play Store. This application provides additional features and customization options, allowing you to personalize your listening experience to suit your preferences. With the Beats app, you can access firmware updates, customize the on-ear controls, and fine-tune the sound settings to optimize audio quality.
The Beats app also offers a seamless connection experience, making it easier to pair your Solo 3 Wireless headphones with your Android devices. It provides real-time battery status and allows you to manage multiple Beats devices effortlessly. By installing the Beats app, you can unlock the full potential of your Beats Solo 3 Wireless headphones and enjoy a more immersive and tailored audio experience on your Android smartphone or tablet.
Accessing the Online User Manual
To gain a deeper understanding of your Beats Solo 3 Wireless headphones, accessing the online user manual is highly recommended. This digital resource offers detailed instructions, troubleshooting tips, and comprehensive information on all features. You can find the online user manual on the official Beats by Dre website or through a simple search engine query.
The online manual provides step-by-step guides on pairing, controlling music playback, charging, and resetting your headphones. It also includes visual aids and diagrams to help you navigate the various functions. Regular consultation of the user manual can help you optimize the performance of your Beats Solo 3 Wireless and resolve any issues that may arise. Always refer to the online user manual for the most accurate and up-to-date information.